

How to machine knit a no roll square with ham and ribbing
/Most machine knitters stay in the beginner's stage for a long time. It is hard to find easy to follow instructions. One reason we like machine knitting is that it knits much faster than hand knitting, so you can experiment with different ideas and see results faster. The technical part of operating and maintaining the machine should not be that hard.
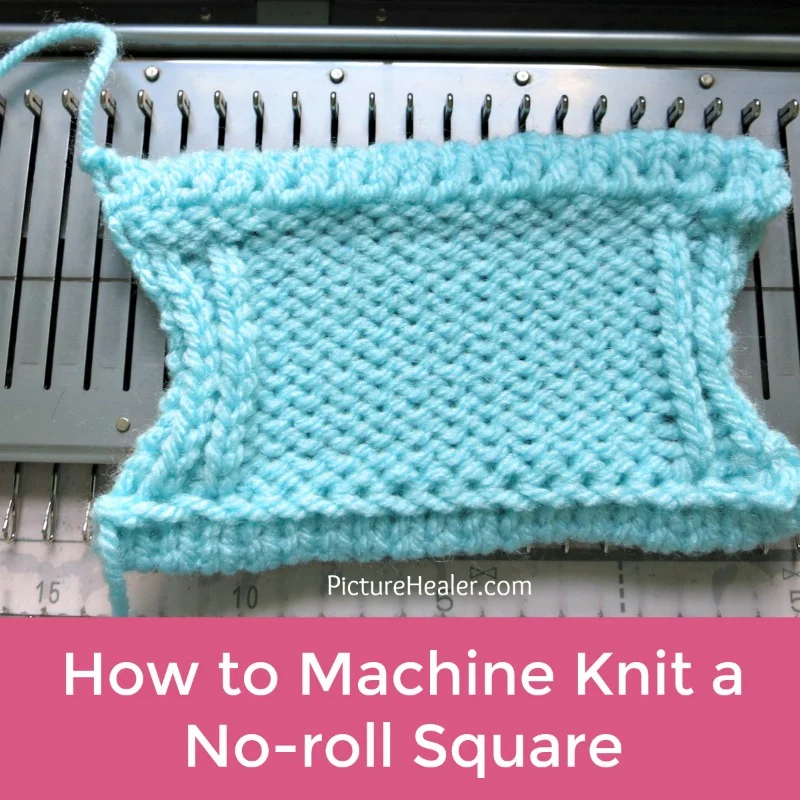
We are planning to add more machine knitting techniques and visual tutorials regularly in the future. Here is a basic of how to knit a square with hem in the top and bottom, and ribbing on the sides, so the fabric does not roll like a standard stockinette stitch. It should be easy to follow even if you are a beginner.
1. Setting Up and threading the yarn
The machine I use is Brother KH260 bulky. Any flat-bed machine will work, such as standard gauge Brother or Singer machine. No Ribber is required because we are going to hand manipulate the ribbing.
To prepare the yarn, choose the yarn matching your machine first. For example, use worsted weight yarn for a bulky machine, DK weight for a mid-gauge machine, and sports weight for a standard gauge machine. Use yarn winder to wind into a center-pulled cone, or place the yarn in a basket/bag and make sure to pull enough yarn loose as you knit.

Place yarn on the floor level and thread it through the wire loop from below.

Push the round disk in and thread the yarn below the pin. Pass the yarn to the left of the guide.

Pass through the loop of the front yarn guide.

Thread through take up spring loop, and clip the yarn on the yarn clip. Now it's ready.
Thread the yarn according to your machine. Here are some typical Brother knitting machine threading pictures. I have my Ribber attached so the tension mast is turned backward. Check the instruction manual for different machine setup.
Make sure the carriage sits properly on the bed with the Sinker Plate screwed on correctly. Set tension of your choice on both the tension mast and carriage tension dial. If not sure, choose the middle (5) and adjust later. There is also a chart in the manual for suggested dial numbers.

Adjust mast tension.

Adjust carriage tension dial.

Make sure the sinker plate is attached to the main carriage properly.
2. E-wrap cast on
There are many ways of casting on such as using a cast on rag, cast on comb, or waste yarn and ravel cord. The quick and easy closed cast on I like is "E-wrap cast on". You can start with a contrasting color waste yarn for a few rows, one row of ravel cord for easy removal later, and start the E-wrap cast on. Or just start E-wrap on the needles like I am showing here. The edge tends to look less neat than starting with waste yarn and ravel cord, but it is easy and quick.
To make an E-wrap cast on, pull out needles to be knitted. I have 10 on the left and 10 stitches on the right. With carriage on the right, starting from left needle, wrap the yarn like the small letter e, using the left finger to push back the yarn, and continue to the right. When all needles are wrapped, place the yarn in the Yarn feeder of the Sinker Plate. Open up all latch hooks with a cut credit card or business card. Now it is ready to knit.

Pull out 20 needles in the center, from left 10 to right 10.

Bring the yarn from tension mast, clip the yarn end so it does not get caught when knitting. Place yarn between first and second left needles.

Starting wrapping the yarn like the letter e.

Push the yarn back with left finger to help everything in place. Do not wrap too tight or the carriage will be difficult to pass.

Open the latches for the first row with a cut credit card.

Place the yarn in the yarn feeder of sinker plate.

Knit the first row by moving carriage from right to left. If the edge stitches are not knit properly, adjust by hand.

Add some weight or cast on comb before continue knitting. Make sure there are weights on both side edges.
Turn the row counter to "0,0,0", and knit the first row by moving the carriage from right to left. Make sure there is enough loose yarn before your move the carriage. If the edge stitches don't knit properly, adjust manually now. Add cast on comb and weight as necessary. Be sure there is some weight at the both edges. The first row is usually more troublesome. It gets easier afterward.
3. Making a Hem
A hemmed edge looks nice and finished. Another finished edge I like is hand manipulated ribbing. It can be 1x1, 1x2, or any combination of knit and purl stitches. Here I am showing how to do a turned hem edging.

Knit 8 rows or double of your final hem rows, because we are going to fold it in half.

Rehang the cast on stitches back to the needles.

Continue rehanging stitches.

Hang some weights before knitting again.
It is very simple, just knit a few stockinette rows (move carriages back and forth), and rehang the cast on edge to the stitches on the needles. I have 8 rows before I take off weights and hang the cast on stitches back to the needles. The final hem will be 4 rows only because it is folded in half. Add some weight and knit one row with slightly bigger tension. You can knit the hem in smaller tension so it is less bulky. I did not do it here so the hem looks a little wider than I like. Now the bottom hem is done.
4. Knit the Body with ribbing sides
To knit the body of the fabric, just keep plain knitting until the desired length. We add some ribbing to each side of the fabric so it does not roll. I have 2 columns of reformed rows on each side. Those rows are hand manipulated with a latch tool to turn knit stitch into purl stitch.

Knit as many rows as you like for the body of fabric. Just move carriage back and forth for plain stitches.

Decide which columns to reform. I have 1 x 1 ribbing on each side, so I picked out 4 needles to drop stitches.

Pull the selected needle all the way out and all the way back to drop stitches. Use tool or finger to push down the stitches.

Use latch tool to insert in the bottom stitches to prevent dropping stitches all the way down.

Move the yarn below the stitch, and place the next ladder stitch in the hook. Pull out the latch, the yarn will be knitted.
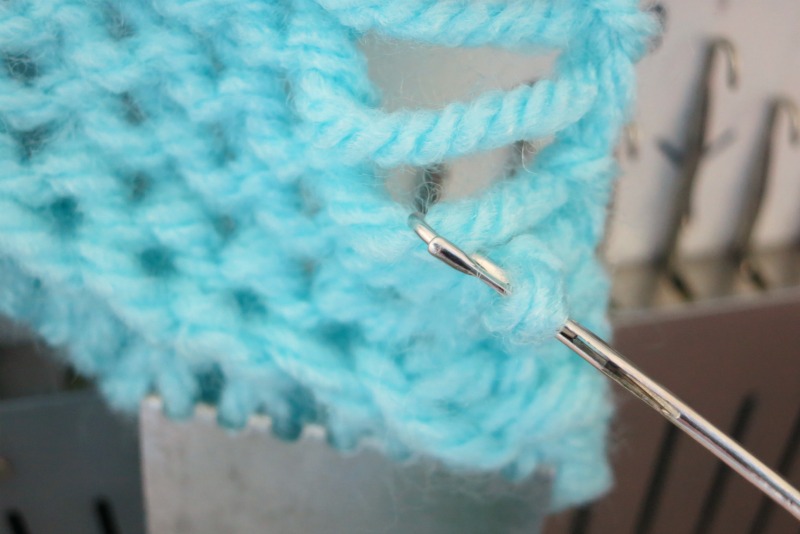
Repeat on every stitches above.
To do so, pull out the needle of stitch we want to rehang, and push the needle all the way back to drop the stitch. Use the latch tool or finger to drop all the stitches in that column except the last one. Insert the latch tool in the last stitch you want to rehang, and start reforming by hook the ladder above, pull the latch tool to make a purl stitch and repeat every stitch above. After it is all done, hang the last stitch back to needle. Repeat on every column you want to reform.

Hook the last stitch back to the needle.

Repeat the reforming process for all selected needles.
5. Hemming the top edge
Knitting the top edge hem is similar to the bottom edge hem. Knit several plain stockinette rows, take off weight and rehang the stitches. Now there are 2 stitches on each needle. See pictures below.

Knit 8 rows (or number to match the bottom hem) of plain stitches for the top hem.

Rehang the stitches back to the needle, just like the bottom hem.
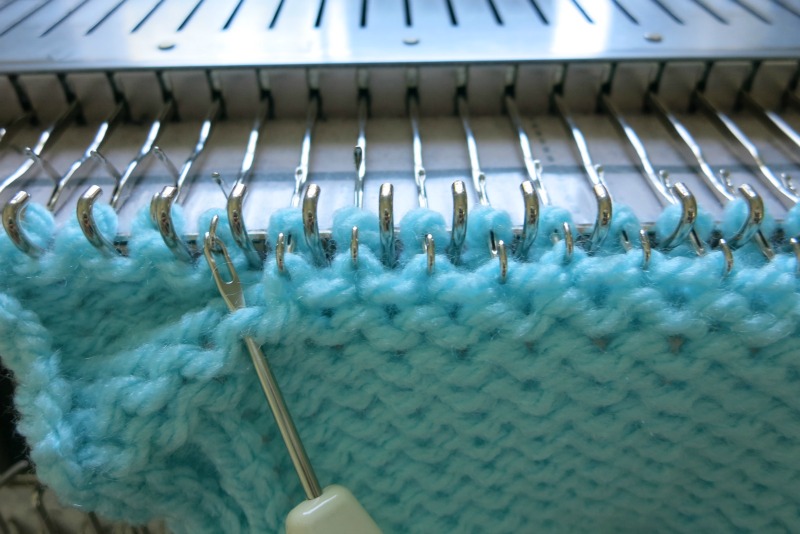
Continue rehanging.

After rehanging. Now ready for bind off.
6. Binding off
There are many ways to bind off. You can knit one last row in a very loose tension and bind off with tools, bind off by knitting a few rows of waste yarn and take off the machine to finish by hand, or you can cut off the yarn leaving a long tail (usually 3-4 times the length of the knitted row), and bind off by hand sewing stitches with a darning needle. Here I am doing the hand sewing method. Threading the yarn through both stitches on each needle, push the needle to non-working position, and repeat on the next needle. Make sure the tension is not too tight or too loose.

Cut the yarn, leaving enough for sewing. Thread the yarn with a big eye darning needle or double eye needle. Thread through 2 loops on the first stitch.

Take the yarn off the first needle, and repeat on the second stitch. Continue binding off.

Bind off the last stitch. Cut the yarn and weaving the yarn end. Done.
Finished
After binding off, cut the yarn and weave in the yarn end. You just finished a simple square with hem and no roll sides. Stretch the knitting and steam lightly for blocking to a natural shape. It is normal to make mistakes here and there in the first few times. Once we learn our machine and the choice of yarn better, everything gets easier. Happy knitting!

Front side of the piece.

Back side of the knitting. Note the ribbing on the sides.


