

Crochet a textured throw blanket (easy pattern)
/A simple crochet project can be very relaxing and meditative. This is one of those projects you can crochet and watch TV at the same time. This one stitch project creates a textured stripe. Make a big blanket with a thick yarn, or use fine wools for scarf or baby blanket.


My throw blanket project
Video how to (updated October 2017) - Click below to see more. Please Subscribe and Comment!!
This throw blanket starts from the long side, and build the width until the yarn runs out. It creates stripes parallel to the long sides.
I believe this stitch is called half double crochet in the US and half treble crochet in the UK. Make sure the hook is inserted into the back loop of the V shape, instead of both legs of V. This creates the texture of ridges and valley.
Yarn used:


Bernat Maker Home Dec. This is a cotton mixed yarn in a tube. It is the same material as the T shirt we wear. Very soft and machine washable and dryable. Labeled bulky weight, number 5.
I have 6 balls of color 11008 or Clay. Hope to make a throw blanket about 62 x 40 inches.
Needle:
Crochet hook 5mm, US size H. I like the stainless steel hook with big plastic handle. I am using Boye brand.
Pattern:
1. Crochet a row of 200 chain stitches. It makes about 62 inches for me. You can adjust to any stitches you like. This is the long side of the blanket.
2. Crochet 2 chain stitches for height. (2 stitches at beginning of every row)
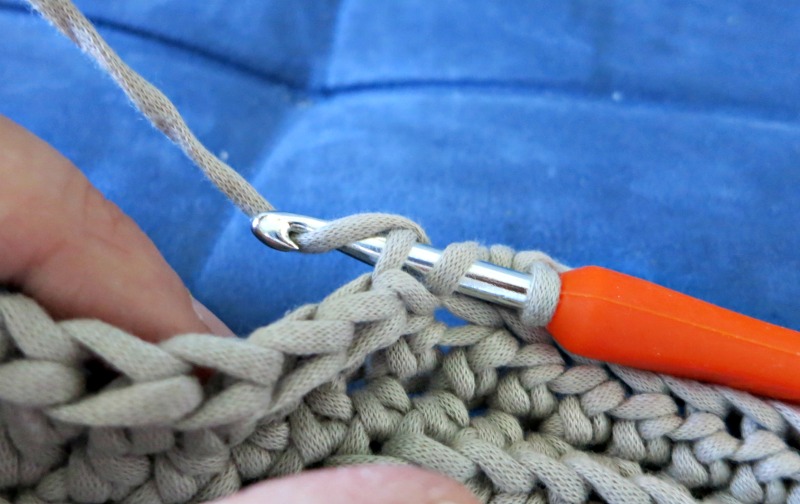
Starting the half double (in the US, or half treble in the UK) stitch through the back loop
1. Make a Yarn over (grab the yarn and make a loop on the hook)

2. Insert the hook into the middle of V shape of the last stitch, or the third stitch if you count the 2 extra chain stitches for height.

3. Grab the yarn (yarn over) and pull through the center of V. Now you have 3 stitches on the hook.

4. Grab the yarn (yarn over) and pull through all 3 stitches on the hook. One stitch is done.

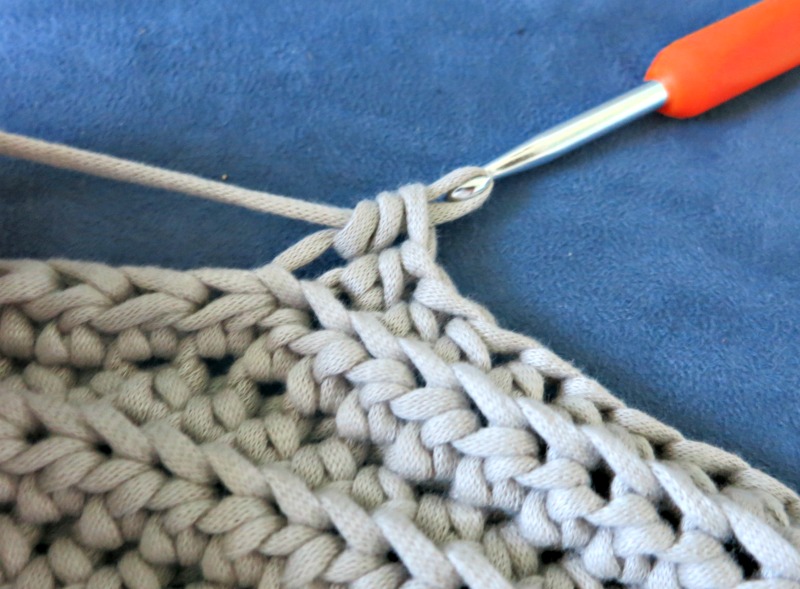
Repeat the same stitches until the end. Make sure to insert the hook to the center of V (or back loop of chain) instead of both legs of the V shape. This creates the raised texture.
At the end of the row, chain 2 stitches, turn the work and starts all over. Count the stitches if you think there is a mistake. You can always rip back and redo it.
That is it. Just keep repeating the same stitches until the desired width or until the yarn runs out.
This is a great mindless project to work on when you want to take a break from complicated projects. It might take me a month to finish the throw but I enjoy working on it. I can pick up the project and put it down anytime without messing up.


How to hand sew a simple fabric book cover video tutorial.